23 Portfolios
23.1 What and why?
What goes into an online portfolio?
- A short bio about yourself.
- A showcase of your favorite projects / assignments. These might be big (a capstone project) or small (eg: a small class assignment, a small project you did on your own). These might be related to statistics / data, about another major, or simply another topic of interest to you.
- Perhaps a link to your resumé.
Why should you have an online portfolio?
It is incredibly helpful (and in some cases critical) when applying for internships, jobs, graduate school, grants, etc.
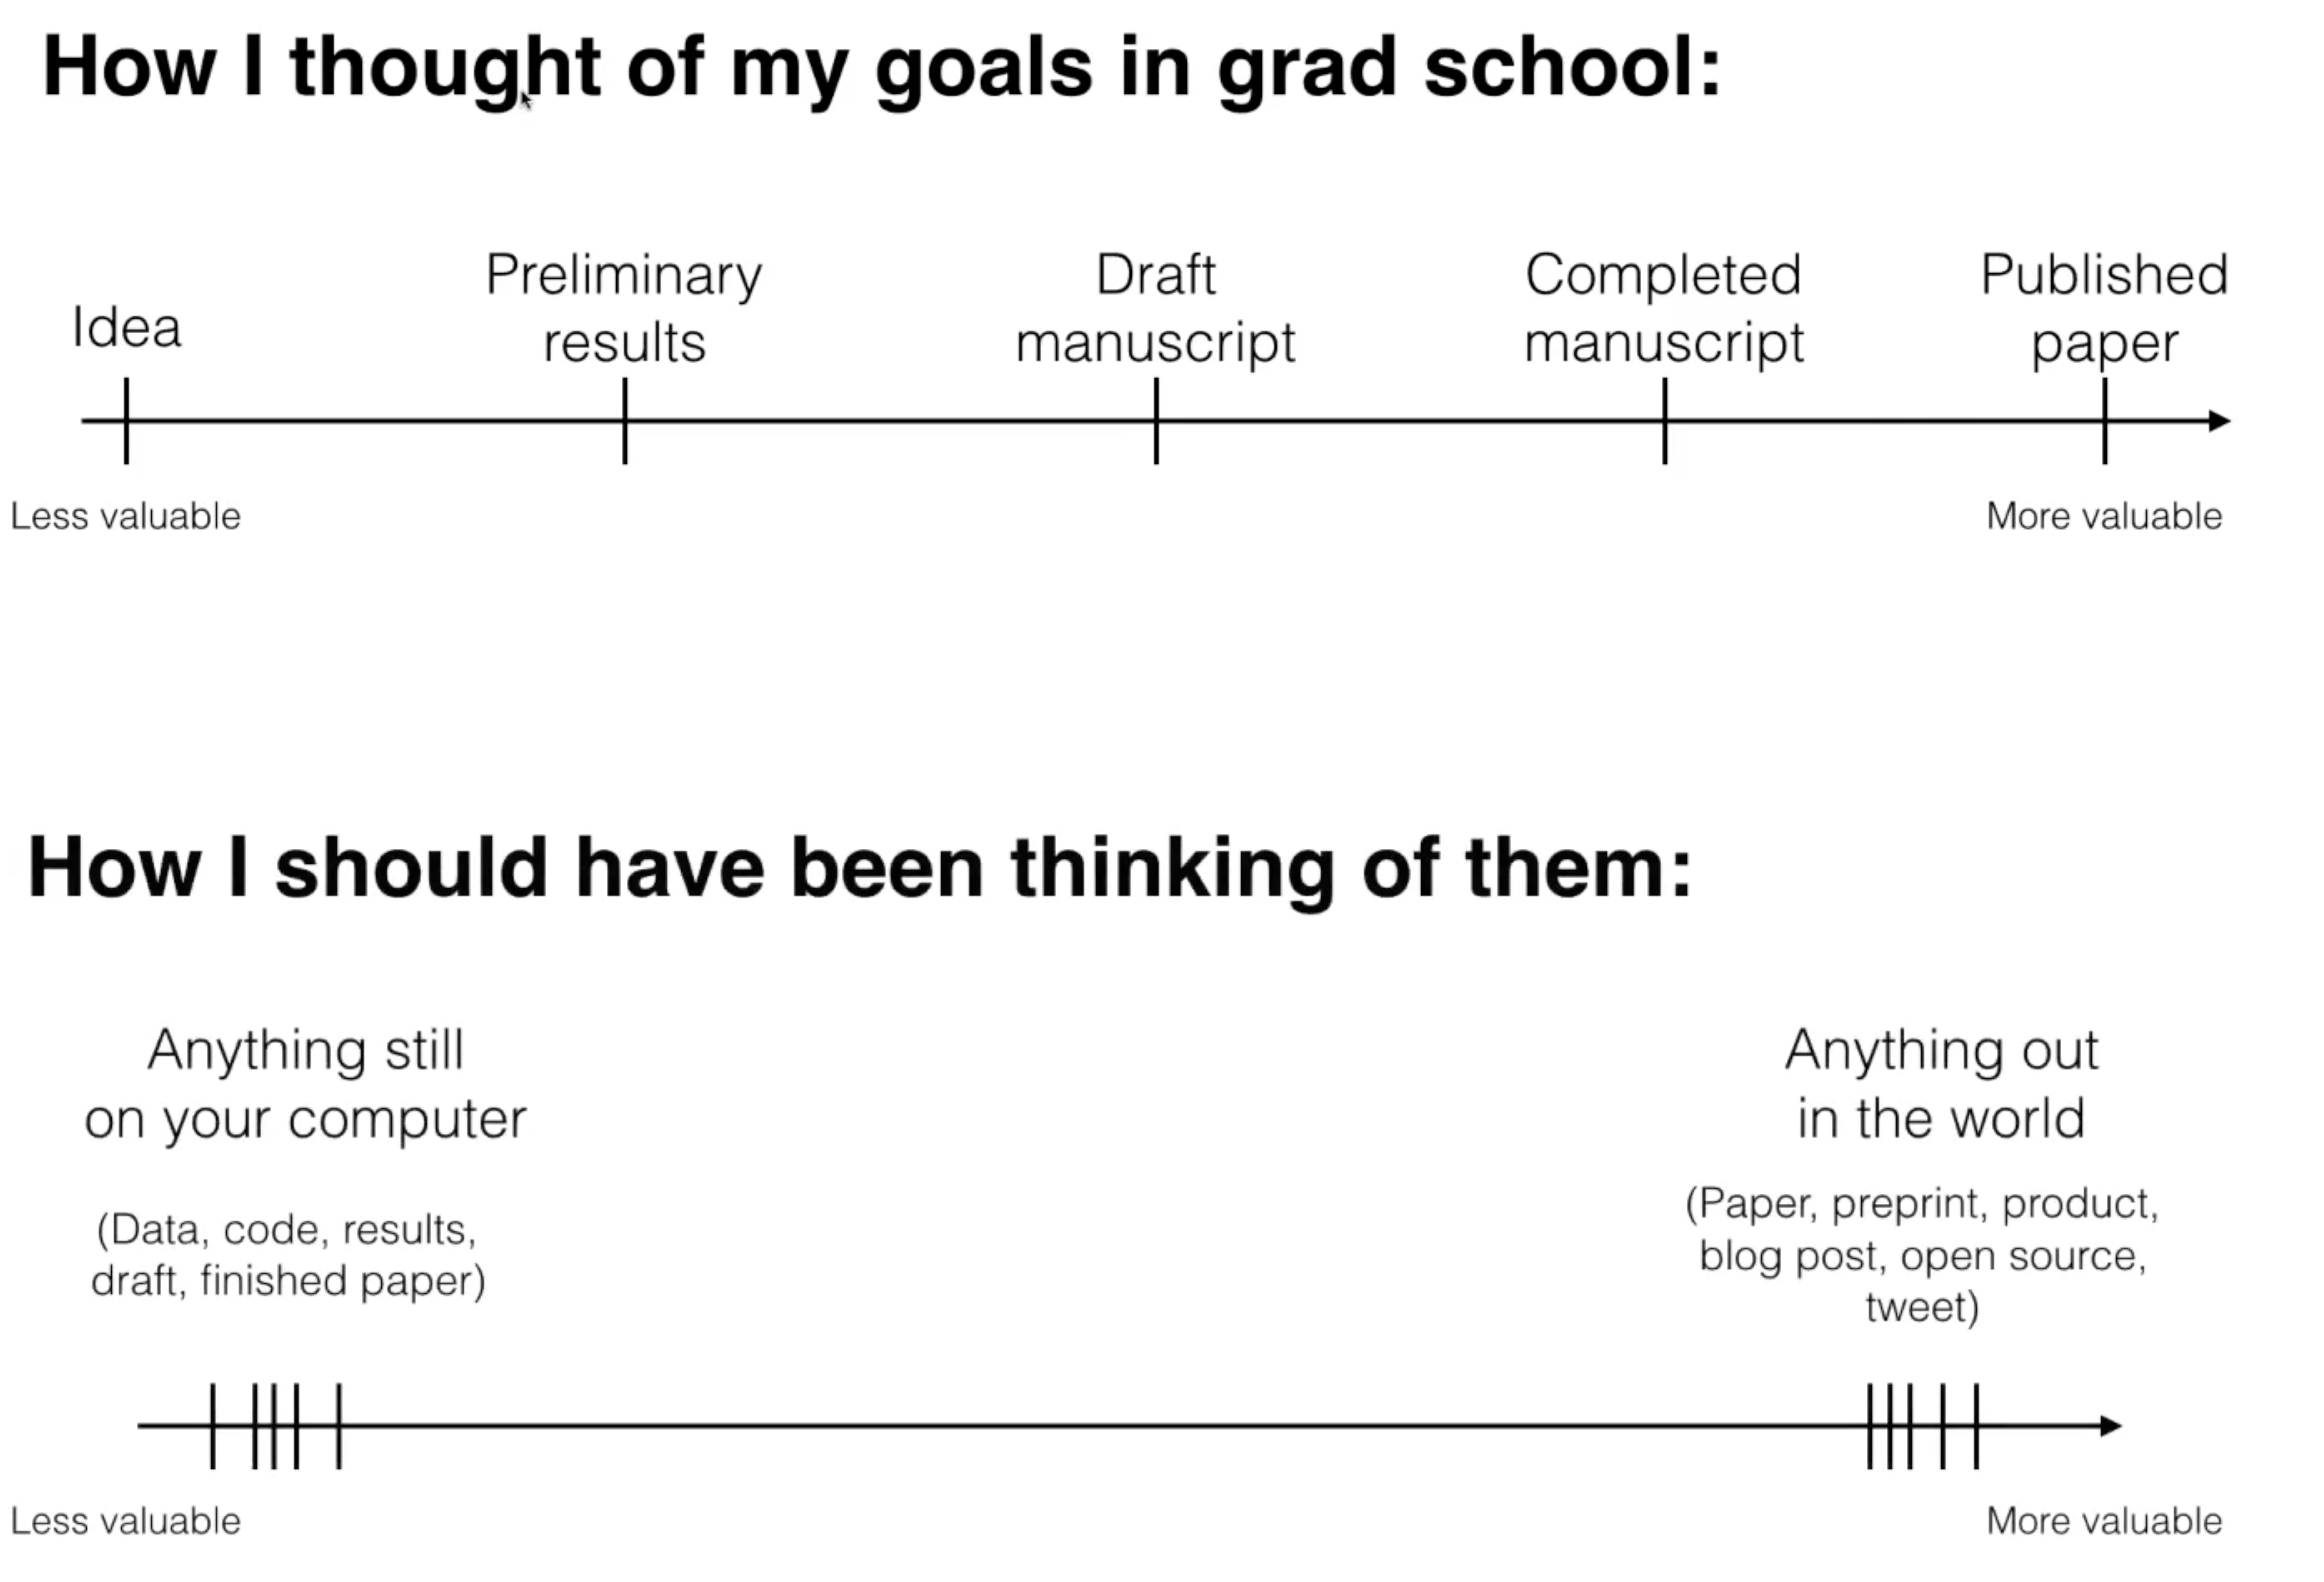
It helps you engage in the broader community (eg: others can check out your work and reach out to you about it) and share your thoughts. David Robinson’s slide from his eUSR talk, “The Procrastinator’s Guide to a Data Science Career,” says it best.
23.3 Structure
Especially if you plan to remain in some statistics / data field, you’re encouraged to consider creating a blog or website using the distill or blogdown packages from within RStudio. Why?
So much of our work is done in RStudio.
distillandblogdownallow us to directly streamline this work to a website. No need to learn another platform or to copy and paste plots / code / etc from RStudio into another platform.Updating your blog is as easy as updating an Rmd.
You’re also welcome to use any of the following, but the instructor might not be able to help as easily:
- GitHub pages
- Google site (this is pretty stable and allows you to control who can see your website)
- any other web platform you’re familiar with
23.4 Getting started with distill
Getting started
- The directions below cover how to build a website with the distill package. The blogdown package is easier to customize, but is a bit tougher to maintain (the supporting templates are updated more frequently).
- The directions below cover how to deploy a distill website on GitHub. You could also deploy your blog on Netlify (or elsewhere). This blog post by Yury Zablotski provides some directions.
More resources
- For more detailed directions on setting up a _distill__ website, see chapters 21–25 in this online rstudio4edu website. Or, the distill manual.
- For inspiration on customizing a distill website, see the distillery.
Steps
- If you are new to GitHub:
- Sign up for a free GitHub account: https://github.com/. Happy Git has good advice on picking a user name.
- Install Git on your computer using these directions. NOTE: There’s a chance that Git is already installed, so you might skip this step and come back to it if necessary.
- Create a new GitHub repository where your website will live.
- Log onto your GitHub account.
- In the upper right hand corner, click “+” and then “New repository.”
- Name your repository YOURUSERNAME.github.io
- Do not initialize with a .gitignore or README.
- Click on “Create repository.”
- Create a new RStudio project that’s linked to GitHub.
- Go back to your GitHub repository. If you didn’t initialize your repository with a README (which you shouldn’t have), copy the HTTPS address posted in the “Quick setup” box.
- Within RStudio, open a new project and select “Version Control.”
- Paste the GitHub HTTPS into the “Repository URL.” Under “Create project as subdirectory of,” make sure that the project will be stored where you want it (eg: your STAT 454 folder).
- Finally, click “Create Project.”
- To work with this project in the future, open the associated .Rproj file.
- Set up the distill project.
Inside your new .Rproj (R project):Install the
distillpackage in RStudio.Type the following into the console. This sets up some files that will create the foundation of your website.
distill::create_website(dir = getwd(), gh_pages = TRUE)
- Build your website
- Close and re-open your R project by clicking on your .Rproj file.
- You should now see a “Build” tab in the upper right corner of RStudio.
- Click the “Build” tab.
- Within the “Build” tab, click “Build website.”
- You should now see what your (very basic) website would look like!
- **Explore and edit the basics: _site.yml and index.Rmd**
Inside your RStudio project:- Open the index.Rmd file. This controls your homepage. You can change up the title and description.
- Open the _site.yml file. This controls the layout of the entire website.
- Change the title to whatever you want to name your website.
- Notice the “navbar.” This controls the navigation bar in the upper right hand corner of the website. Currently, the navigation bar includes a Home page and an About page.
- Explore and edit the basics: about.Rmd
The content of the “About” tab is controlled by the about.Rmd file.- Open the about.Rmd file.
- Change the title and description.
- about.Rmd works the same as any other Rmd. We can include text, links, mathematical equations, code, plots, etc.
- Try adding some new content and then knit the about.Rmd. After knitting, you might then “Build website” for good measure.
- Edit your website: add a tab and page for your projects (or whatever you want)
In a portfolio, you’ll want to have a page that displays or links to some examples of your work. Here’s how to do that:- Open a new .Rmd file.
- Change the yaml at the top of the Rmd. Include whatever title you want and set
listing: posts.
---
title: "Projects"
listing: posts
---
- Open the _site.yml file. Link your new Projects page in the
navbar:
- text: "Projects"href: projects.html - Build your website. Note that you now have a “Projects” tab and, in your files, a new "_posts" folder.
Create content for your website: adding a project to the Projects page
To share a project within the Projects page:Open a new Rmd.
Delete the contents and put something like the below text at the top of the Rmd:
titlespecifies a title for your project,descriptionspecifies a short set of text that will be displayed next to the title, the optionalpreviewspecifies an image (either from your files or the internet) to use as a thumbnail for the project,datespecifies the date of your post, andoutputspecifies that the Rmd should be treated like a distill article.---
title: "Data visualization"
description: |
I did some data viz!
preview: https://www.macalester.edu/admissions/wp-content/uploads/sites/190/2020/01/admissions-aid-hero2-1440x0-c-default.jpg
date: 01-01-2021
output:
distill::distill_article:
self_contained: false
---Add whatever content you want to the Rmd.
Create a new subfolder within the
_postsfolder (eg: named “data viz”) and save your Rmd within this subfolder. The subfolder isn’t essential but helps keep the files organized.Knit the Rmd.
Build the website.
Check it out. You should now see your project on the “Projects” page and be able to click on it.
Create more content: adding another project to the Projects page
We can repeat the steps above to include another project on the Projects page. When we build the website, the projects are ordered from newest to oldest. Example:---
title: "Data wrangling"
description: |
I did some data cleaning!
preview: https://www.minnpost.com/wp-content/uploads/2018/09/MacalesterCollegeStoneSignThumb.png
date: 01-02-2021
output:
distill::distill_article:
self_contained: false
---
- Publish your website
Once you’re ready to launch your website on GitHub pages, take the following steps:- Make sure to knit any Rmd files and then “Build website.”
- To get your files from RStudio into GitHub:
- Go to the “Git” tab in the upper right panel of RStudio.
- Select / click the boxes next to all files except .DS_Store, .gitignore, and your .Rproj file. (That said, it probably wouldn’t hurt to select these, too, assuming this is your own repo.)
- Click the “Commit” button above your files then write a brief message about what you’re committing (eg: launch website, add data viz post, etc). This is a way to communicate with yourself and track changes in the future.
- Click the “Commit” button.
- Click the “Push” button. This pushes your file / changes to your file to the GitHub repository.
- Check out your GitHub repository. Your new files / changes are there along with your commit message!
- To turn your GitHub files into a website:
- Click on “Settings” in the upper right corner of your GitHub repository. This might fall under 3 dots “….”
- In the toolbar on the left side of the page, go to “Pages.”
- Under “Source,” make sure to select “Branch: main” and then, next to the folder icon, select “/docs” (not “/(root)”). Then click “Save.” This tells GitHub to build your website from the files in the “docs” folder – this folder was automatically created when you built the website in RStudio.
- Check out your website! The address is provided at the top of the GitHub “Pages” tab that you were just working in, and should end in .github.io. This could take a few minutes to show up, thus keep refreshing your browser.
- Keep customizing!
For example:- You can add more information to your home page.
- You might delete the About tab and put information about yourself on the home page.
- You can remove the dates from the project posts. (This requires a style file – ask the instructor).
- Check out various styles & templates in the distillery.
23.5 Getting started with blogdown
The blogdown manual is the primary resource for building and maintaining a blog using blogdown. You can also check out examples of blogdown sites here.